정의
API문서를 주석기능을 이용해 YAML 또는 JSON 형식으로 작성하고, 서버의 라우트를 통해 접속하여 문서 페이지로 확인하는 기능을 제공하는 프레임워크
Dependency
<dependency>
    <groupId>io.springfox</groupId>
    <artifactId>springfox-swagger2</artifactId>
    <version>2.6.1</version>
</dependency>

<dependency>
    <groupId>io.springfox</groupId>
    <artifactId>springfox-swagger-ui</artifactId>
    <version>2.6.1</version>
</dependency>
Swagger Annotation
ex)
import org.springframework.context.annotation.Bean;
import org.springframework.context.annotation.Configuration;
import springfox.documentation.builders.PathSelectors;
import springfox.documentation.builders.RequestHandlerSelectors;
import springfox.documentation.service.ApiInfo;
import springfox.documentation.service.Contact;
import springfox.documentation.spi.DocumentationType;
import springfox.documentation.spring.web.plugins.Docket;
import springfox.documentation.swagger2.annotations.EnableSwagger2;

import java.util.ArrayList;

@Configuration
@EnableSwagger2
public class SwaggerConfig {
    private String version;
    private String title;

    @Bean
    public Docket apiV1() {
        version = "V1";
        title = "victolee API " + version;

        return new Docket(DocumentationType.SWAGGER_2)
                .useDefaultResponseMessages(false)
                .groupName(version)
                .select()
                .apis(RequestHandlerSelectors.basePackage("com.victolee.swaggerexam.api.v1"))
                .paths(PathSelectors.ant("/v1/api/**"))
                .build()
                .apiInfo(apiInfo(title, version));

    }

    @Bean
    public Docket apiV2() {
        version = "V2";
        title = "victolee API " + version;

        return new Docket(DocumentationType.SWAGGER_2)
                .useDefaultResponseMessages(false)
                .groupName(version)
                .select()
                .apis(RequestHandlerSelectors.basePackage("com.victolee.swaggerexam.api.v2"))
                .paths(PathSelectors.ant("/v2/api/**"))
                .build()
                .apiInfo(apiInfo(title, version));

    }

    private ApiInfo apiInfo(String title, String version) {
        return new ApiInfo(
                title,
                "Swagger로 생성한 API Docs",
                version,
                "www.example.com",
                new Contact("Contact Me", "www.example.com", "foo@example.com"),
                "Licenses",

                "www.example.com",

                new ArrayList<>());
    }
}
Docket
@Configuration
@EnableSwagger2
public class SwaggerConfig {

  @Bean
  public Docket api() {
    return new Docket(DocumentationType.SWAGGER_2)
        .select()
        //apis는 할당된 경로에 있는 모든 uri들을 추출한다. 현재는 any이므로 모든 uri들을 추출한다.
        .apis(RequestHandlerSelectors.any())
        //paths는 해당 옵션은 특정 uri들만 선택할 수 있다.
        .paths(PathSelectors.any())
        .build();
  }
}
@EnableSwagger2
- Swagger2 버전을 사용하겠다는 의미다.
@EnableWebMvc
- 어노테이션 기반의 SpringMVC를 구성할때 필요한 Bean설정들을 자동으로 해주는 어노테이션.
- 기본적으로 등록해주는 Bean들 이외에 추가적으로 개발자가 필요로 한느 Bean들의 등록을 쉽게 해준다.
useDefaultResponseMessages( )
- false로 설정하면, swagger에서 제공해주는 응답코드(200,401,403,404) 에 대한 기본메세지를 제거한다.
- 불필요한 응답코드와 메세지를 제거하기 위함이며, 컨트롤러에서 명시해줄것이다.
groupName( )
- Docket Bean이 한개일 경우
- 기본값은 default이므로 생략가능
- 여러 Docket Bean을 생성했을 경우
- groupName이 충돌하지 않아야 하므로, 여기서는 각 Docket Bean의 버전을 명시함.
select( )
- ApiSelectorBuilder를 생성
apis( )
- api 스펙이 작성되어 있는 패키지를 지정
- 컨트롤러가 존재하는 패키지를 basepackage로 지정하여, RequestMapping이 선언된 API를 문서화한다.
// com.Example.swagger 패키지 내에 있는 uri들만 추출하려면 이런식으로 설정해주면 된다..apis(RequestHandlerSelectors.basePackage("com.Example.swagger"))
paths( )
- apis( ) 로 선택되어진 API중 특정 path조건에 맞는 API들을 다시 필터링하여 문서화한다.
// 설정된 패키지 내에서 /test/로 시작하는 uri들만 추출하려면 이런식으로 설정해주면 된다.paths(PathSelectors.ant("/test/**"))
apiInfo( )
- 제목,설명 등 문서에 대한 정보들을 보여주기 위해 호출
- 파라미터 정보는 다음 순서이다.
- public ApiInfo( title, description, version, termsOfServiceUrl, contact, license, licenseUrl, vendorExtensions )
주요 Anotation
@API
- 해당 클래스가 Swagger 리소스라는 것을 명시한다.
- value
- 태그를 작성한다.
- tags
- tags를 사용하여 여러개의 태그를 정의할 수 있다.
- value
@Path("/pet")@Api(value = "/pet", description = "Operations about pets")@Produces({"application/json", "application/xml"})public class PetResource { ...}
@ApiOperation
- 한개의 operation(즉, API URL과 Method)를 선언한다.
- Api의 이름, 설명을 기록하는 어노테이션이다.
- Controller에 작성하는 어노테이션이다.
- value
- API에 대한 간략한 설명(제목같은 느낌으로) 작성한다.
- notes
- 더 자세한 설명을 적어준다.
- value
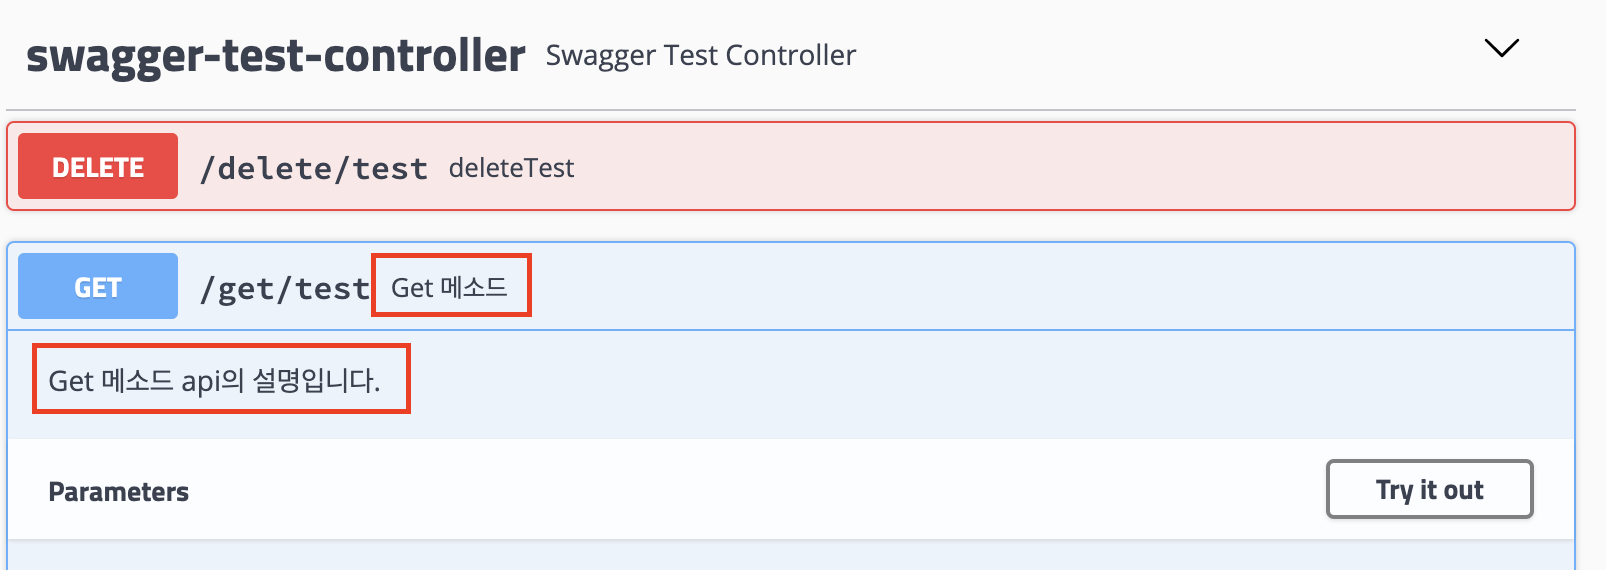
//ex@GET @Path("/findByStatus") @ApiOperation(value = "Finds Pets by status", notes = "Multiple status values can be provided with comma seperated strings", response = Pet.class, responseContainer = "List") public Response findPetsByStatus(...) { ... }@ApiOperation(value = "Get 메소드", notes = "Get 메소드 api의 설명입니다.")

@ApiResponse
- operation의 가능한 response를 명시한다.
- Api의 응답을 기록하는 어노테이션.
- code
- 응답코드(HttpStatus를 나타내는 옵션)를 작성한다.
- message
- 응답에 대한 설명을 작성한다.
- response
- 응답 형태를 나타내는 옵션을 작성한다.
- code
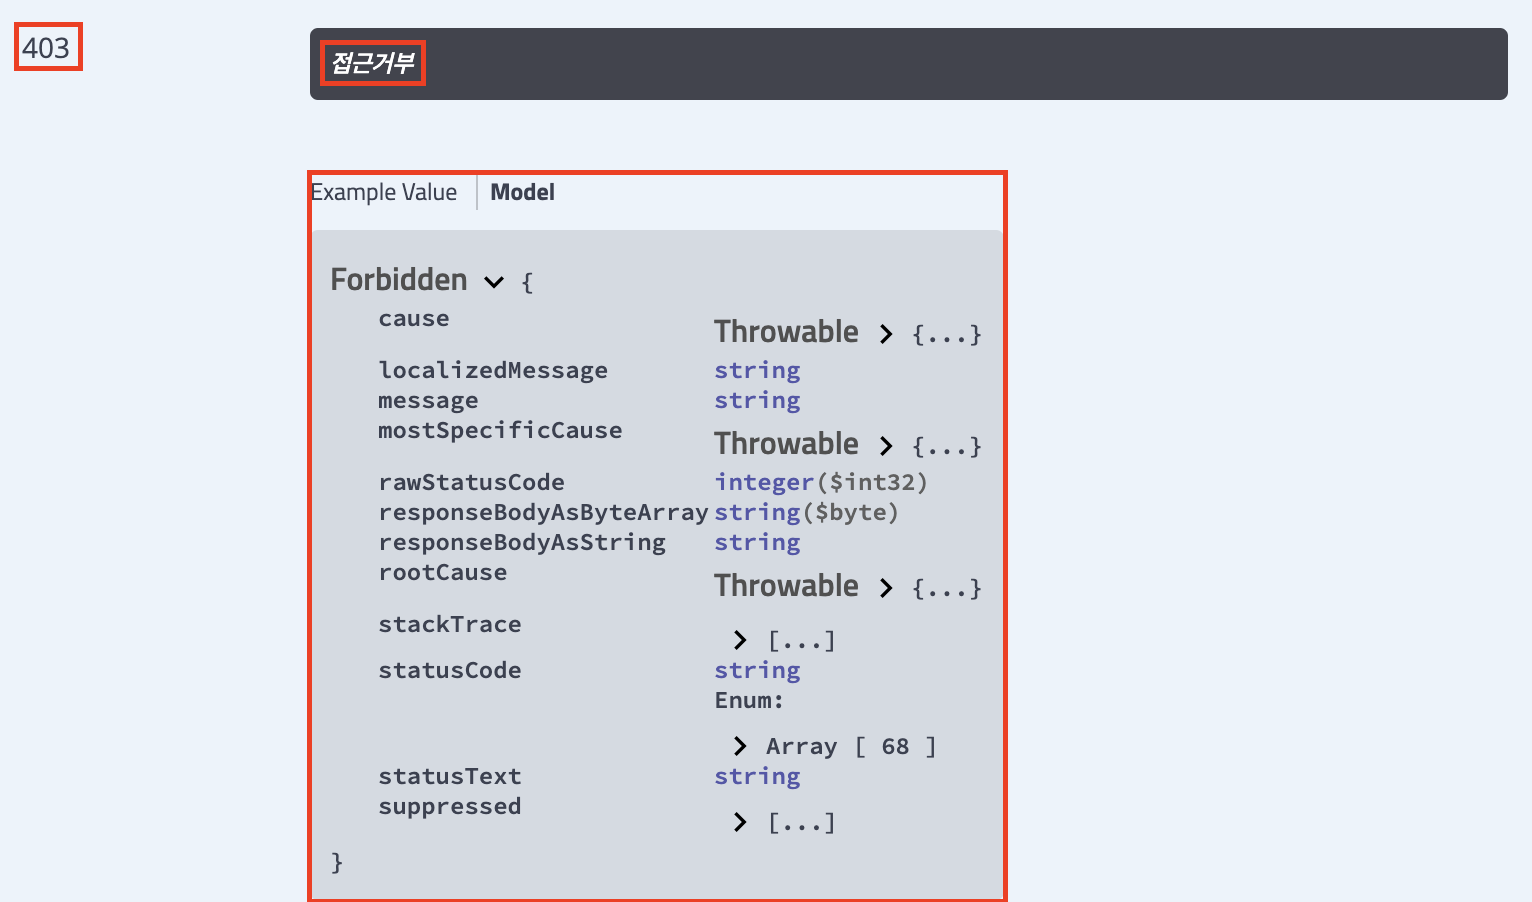
@ApiResponses({ @ApiResponse(code = 200, message = "성공", response = Map.class), @ApiResponse(code = 403, message = "접근거부", response = HttpClientErrorException.Forbidden.class), @ApiResponse(code = 500, message = "서버 에러", response = ServerError.class), })

@ApiResponse && @ApiOperation 예시
Controller에서 해당 api위에 이런식으로 작성
@GetMapping("/get/test")
@ApiOperation(value = "Get 메소드", notes = "Get 메소드 api의 설명입니다.")
@ApiResponses({
    @ApiResponse(code = 200, message = "성공", response = Map.class),
    @ApiResponse(code = 403, message = "접근거부", response = HttpClientErrorException.Forbidden.class),
    @ApiResponse(code = 500, message = "서버 에러", response = ServerError.class),
})
public String getTest() {
    return "test";
}
@ApiParam
- 파라미터에 대한 정보를 명시한다.
- value
- 파라미터 정보를 작성한다.
- required
- 필수 파라미터면 true, 아니면 false를 작성한다.
- example
- 테스트할 때 보여줄 예시를 작성한다.
- value
@Path("/{username}") @ApiOperation(value = "Updated user", notes = "This can only be done by the logged in user.")public Response updateUser( @ApiParam(value = "name that need to be updated", required = true) @PathParam("username") String username, @ApiParam(value = "Updated user object", required = true) User user) {...}
@ApiModel
- 해당 모델을 설명할때 사용한다.
- VO,DTO,Entity등 모델에서 사용하는 어노테이션
- description
- 모델을 설명하는 옵션
- description
@ApiModel(description = "유저 모델")
@ApiModelProperty
- 모델 내의 필드(변수) 를 설명할때 사용한다.
- VO,DTO,Entity등 모델에서 사용하는 어노테이션
- required
- 필수 여부를 적는 옵션
- value
- 필드의 이름을 적는 옵션
- example
- 필드의 예시를 적는 옵션
- hidden
- 필드를 숨기는 여부를 적는 옵션
- required
@ApiModelProperty(required = true, value = "사용자 아이디", example = "ksshlee", hidden = true) private String id;@ApiModelProperty(required = true, value = "사용자 이름", example = "이상혁") private String userName;
@ApiModel && @ApiModelProperty 예시
@Getter
@Setter
@ApiModel(description = "유저 모델")
public class UserVO {
@ApiModelProperty(required = true, value = "사용자 아이디", example = "ksshlee", hidden = true)
  private String id;

@ApiModelProperty(required = true, value = "사용자 이름", example = "이상혁")
  private String userName;
}
- id는 hidden으로 설정했기 때문에 보이지 않는다.
이외의 Anotation
@ApiImplicitParam
@ApiImplicitParams
@ApiResponses
@Authorization
@AuthorizationScope
참고
- swagger-api/swagger-core
- [Swagger-API Docs 자동화](
'Web > etc' 카테고리의 다른 글
| M1 기반 환경세팅 (0) | 2022.03.05 |
|---|---|
| JWT, 이 친구에 대해서 알아보자 (0) | 2021.11.12 |


